Tuesday, December 4, 2012

RUPERT - a little dragon

Pebble fabric

Spotty fabric

Spotty fabric

Pink hearts fabric
Rupert is a lovely, very simple dragon.  The body is in one piece with spines down the back.  There are little arms and legs which can be thread jointed onto the body or glued.  The wings are small enough to not need any wiring - just a piece of batting holds the shape nicely.

I originally made Rupert as a holiday class for school aged children (ages 8 - 13 years).  I did the machine work and they did all the turning, stuffing and hand sewing.  Well, they loved it so much they asked for another (Crispin of Cornwall), then another (Sir Richard) and another (Wesley & Junior) ,and finally one  more (Rainbow Dragons).  We did them over successive holidays.  By the end of 5 lots of school holidays they had a wonderful collection.

As a blog-featured animal, Rupert is available as a print pattern and as an e-pattern for 30% off the regular retail price for December only.

Hugs
Raewyn

Ballet Class

Another design I just love making.  Ballet dancers are in fixed positions (the legs will not move), and are designed to be hanging dolls.  They look gorgeous as a set as you can see in the photos - just imagine how lovely they would look on the wall of a little girl's bedroom.

Lavender

Pink

White

Black   

So, the dolls are about 15 inches tall.  The body is all in one piece, the head is separate. I paint the leotard and ballet slippers onto the body using fabric paint, and then when completely dry, put on a topcoat of varnish.  The braid around the top and bottom of the leotard and round the slippers very effectively covers any 'scraggy and scrappy' paint lines.

The face is painted using the technique for Lavinia.  I use a variety of yarns for the hair, often blending several together to get the right shade.

The pattern is Ballet Class, and it is available to buy on my website as a e-pattern (pdf download) or as a print pattern (free posted out to you!)...as a blog-featured pattern it is on special now for December at 30% discount!!!

Hugs
Raewyn

Monday, December 3, 2012

Rainbow dancers

I love making these little dancing dolls.  They are so sweet and look simply gorgeous as a set.  They take very little fabric - you will get at least 2 out of a fat quarter, and just a small piece of flesh fabric is needed for the heads.

I have been having fun with a variety of different yarns for the hair.  There is a HUGE range of textures, colours, blends to choose from - something to match every piece of fabric you have chosen.

The heads are the same size as  the little Lavinia heads, so you can use the tutorial below to paint the heads.

As you can see I tend to use only the more traditional poses.  I guess as I'm making these for sale, I have to make the most popular ones - and I know that anything in pink will sell quickly!  Lol gotta love little girls!!!

Pattern is Rainbow Dancers and is available on website.  As a blog-featured design it is on special for December at 30% discount!

Hugs
Raewyn

Monday, October 22, 2012

Lavinia - little ballerina doll


Here are the little Lavinia dolls all finished.


Hugs
Raewyn

Tuesday, October 16, 2012

Face Painting 2 - an alternative

So I have also been looking at different faces, especially for the smaller dolls, when painting eyes are quite fiddly.  Here's my attempt at using beads.  The mouth is a bit scary and certainly lacks the appeal of the painted one.

What do you think?

Hugs
Raewyn

Face painting - Lavinia - a quick tutorial

I'm making a few little Lavinia dolls, and up to painting the faces - this is how I do mine:
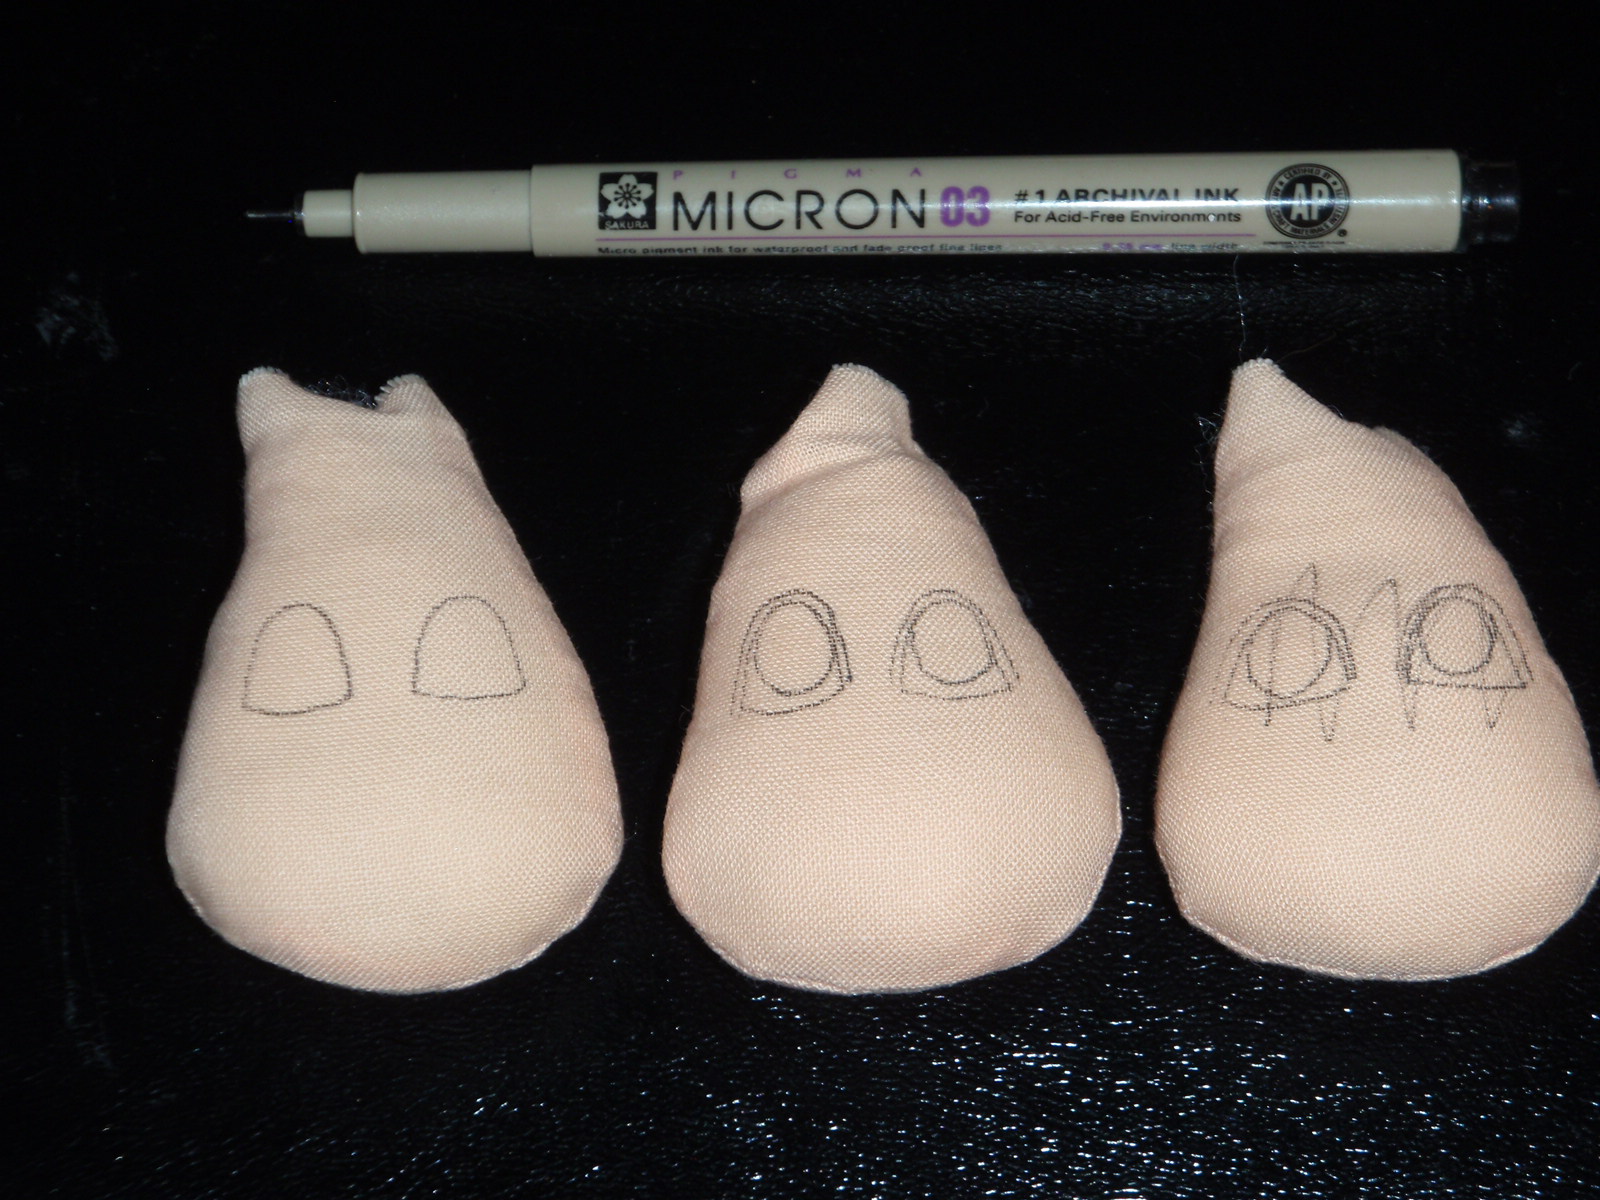
First, using a Micron Pigma pen .03 I draw the outline of the eye - kind of like a hill with a line underneath it.  Than I draw the eyelid.  Then I draw in the pupil.  As you can see, even though I have painted hundreds of faces over the years, I still make mistakes.  I always sew and stuff more heads than I need.  So if I'm making 6 dolls, I will make up to 10 heads - always need to have some spare.


Now, time to paint the white of the eye.  I am using a fairly thin white fabric paint and a very small 000 brush.  Be careful when painting - take your time.  If you go over the 'line' as I often do on these very small heads, don't panic too much.  You can touch it up later.  Now it's really important to wait for the whites to dry...the wet paint clogs up the pens terribly - the pens are expensive, so you have to look after them.


Got them all painted and drying - now take a close look - they're not perfect, but I will fix them up later (and I have the spares! if I don't like the way they are at the end!)  Oh and don't forget, there is nothing perfect in Nature!


 Right-o.  Time to paint the irises.  I use a variety of different pens as you can see - always test on a piece of the flesh fabric first.  Most of the pens will 'bleed' if you hold the pen on for too long, so use short little 'flicky' strokes for your colour.


  Back to your black pen.  Draw in the pupil and draw over the eye and draw the eyelashes.  Draw a couple of eyebrows.  Now I take the time to draw back over any of the black first lines to fix up any places where I was a little careless with the white paint.  Looking good!


Draw the mouth now. I usually don't put blush or white dots to the eyes until I have completed the dolll - I like to make the doll come alive when she is fully dressed, with hair and embellishments. But I have completed one to show you.  I use a crayon for the cheeks, building up the colour gradually.  I always put t little white dot on the eye as well.

Pretty happy with this one - I'll probably put this on a doll!

Have a go yourself - I have developed my own style of face as most dollmakers do - I can recognise a face that I have drawn.  You will find your inner artist too, I'm sure.

Hugs
Raewyn


Sunday, October 14, 2012

Charlotte's Sampler - a new stitchery


I made this sampler for the dear Charlotte for her 21st birthday.  I used similar motifs to the other stitcheries and sayings, and did the whole sampler in redwork.

Pattern coming soon.

Hugs
Raewyn


Tuesday, October 9, 2012

Between the Shows

September17 - 20 

 We decided to 'take to the road' for the Dunedin and Invercargill shows rather than travelling back to Christchurch in between.  So we hired a motorhome and loaded it up with stock and our personal gear and headed south.  After the Dunedin Show we went inland to Cromwell for a night (Monday night). 
Lake Dunstan on the way to Cromwell
 Then we drove through Central Otago (Kawarau Gorge and Lake Wakatipu) to Te Anau for a night (Tuesday night). 

By Lake Wakatipu with Remarkables

Lunch break at Kingston, Lake Wakatipu

 Then round the southern coast through Manapouri, Tuatapere, Riverton and round to overnight at Curio Bay in the Catlins (Wednesday night).
Camping at Curio Bay

Set up day we went to Bluff, had a feed of fresh fish and oysters (as you do in Bluff), and did our set-up.  Brilliant fun - definitely gypsies again next year!!!

The Great New Zealand Craft Show - Invercargill

Invercargill 21 - 23 September

Waiting for opening, Invercargill


Velodrome, Invercargill


So after Dunedin we went even further south to Invercargill for the last show of the year.  We had a good show, but the venue was a bit of a challenge.  We were inside a velodrome, and regularly had cyclists zooming round the track.  It was also very hot at times, and the access in and out was not easy.  But it was fun and we will definitely do it again next year (as long as the new stadium is ready!)

The Great New Zealand Craft Show - Dunedin

Dunedin 14 - 16 September


After the Christchurch show we headed south down to Dunedin.  We were in the Edgar Centre.  It was a great show, but it was sooo cold in the venue ( a large sports arena which often had the doors open and a howling cold southerly blasting through!).  It was also lovely to catch up with one daughter who is studying there.  Again, great customers, and lovely vendors.

The Great New Zealand Craft Show - Christchurch


Christchurch 7 - 9 September 2012


 This is the first time we have done the Christchurch Show.  Because of earthquake damage, we were in a large big top tent.  We had a fantastic first show back  in our home town - lovely customers and lovely other vendors.


Wednesday, March 21, 2012

STEAMPUNK WEEK - Poppy - steampunk cloth doll


Here is Poppy.
I just loved making her,and spent ages on the embellishments. Now I'd like a whole 'flock' of them.


Hugs
Raewyn

Tuesday, March 20, 2012

STEAMPUNK WEEK steampunk cloth dolls


Victoria goes steampunk.

Using Victoria pattern, I have made her a steampunk rag doll. The 'straight' Victoria has a simple drawn face...I decided to paint a 'real' eye and lips to go with the alternate theme. I have used the wonderful steampunk fabric I got from the US.

I think the really fun bit is the embellishments. I have a stack of charms, chains, hats that I can use. Mostly I have these from eBay, but some I have got from Sunshine Crafts. Of course being so far away from the US, postage is high, but I can't source these in New Zealand, so...

Hugs
Raewyn